|
General Disclaimer: (HV) (DC) injury or death hazard, use at your own risk, may void warranty. |
Difference between revisions of "GrayPearl"
(Day1 Photos!) |
(→Photos: captions for Days 2, 4, 5) |
||
| Line 29: | Line 29: | ||
Image:Day_1_Image_20.jpg|Drilling the hole for the box. | Image:Day_1_Image_20.jpg|Drilling the hole for the box. | ||
</gallery> | </gallery> | ||
| + | |||
| + | ===Day 2=== | ||
| + | <gallery> | ||
| + | Image:Day_2_Image_1.jpg|bolting the battery box by the muffler. | ||
| + | Image:Day_2_Image_2.jpg|The heat shield removed and the battery bolt holes exposed. | ||
| + | Image:Day_2_Image_3.jpg|The heat shield installed. Notice the battery box bolt. | ||
| + | Image:Day_2_Image_4.jpg|The CAN-View installed. It is a very simple installation process (more images to follow). Main read out screen and change of PHEV controls are all done on the Prius display screen. | ||
| + | Image:Day_2_Image_5.jpg|Rich Rudman doesn’t want to be bothered! CAN-View installation. | ||
| + | Image:Day_2_Image_6.jpg|Removing the protective cover of the Prius HV battery box. Underneath are the main contactors. | ||
| + | Image:Day_2_Image_7.jpg|The orange cables are the most positive and most negative of the Prius HV system. | ||
| + | Image:Day_2_Image_8.jpg|The Rudman kit – cables come off of the HV battery. A couple of installation points inside. | ||
| + | Image:Day_2_Image_9.jpg|John working on the sharp edges of the HV cover. | ||
| + | Image:Day_2_Image_10.jpg|Inside the PHEV HV box where the main contactors are and cables. The black-coated cables represent our installation. | ||
| + | Image:Day_2_Image_11.jpg|tapping into the NAV system 12V wire to install the CAN-View. | ||
| + | </gallery> | ||
| + | |||
| + | ===Day 4=== | ||
| + | <gallery> | ||
| + | Image:Day_4_Image_1.jpg|CAN-View. | ||
| + | Image:Day_4_Image_2.jpg|Rich standing by his charger. The charger is bolted into a cavity on the driver’s side. It also acts as a DC-DC converter for the PHEV system. | ||
| + | Image:Day_4_Image_3.jpg|The CAN-View is on top of the NAV and underneath the driver’s seat. | ||
| + | Image:Day_4_Image_4.jpg|The battery box, charger, and relay box (with contactors) are shown here. All are part of the kit. | ||
| + | Image:Day_4_Image_5.jpg|The batteries have now been installed! | ||
| + | Image:Day_4_Image_6.jpg|The inside of the relay box. Notice the contactors. This controls the AC charging and the DC-DC function. It also has a safety so the DC-DC switches off when the car is charging or inactive completely. | ||
| + | Image:Day_4_Image_7.jpg|Another view of the charger when it’s on. | ||
| + | Image:Day_4_Image_8.jpg|Rich is testing the voltage of the batteries. | ||
| + | Image:Day_4_Image_9.jpg|The job is done! Everyone smiling in front of the completed car on Saturday. Everybody there helped out that day. | ||
| + | </gallery> | ||
| + | |||
| + | ===Day 5=== | ||
| + | <gallery> | ||
| + | Image:Day_5_Image_1.jpg|The kit installed with carpeting put back in. Lots of cables and wires to be hidden yet! | ||
| + | Image:Day_5_Image_2.jpg|testing some of the regs – the readout of the computer program. Only 6 are in the kit now and they all don’t quite work. Must make sure not to drain the batteries too much until all the regs arrive, are installed, and properly set. The computer program sets the reg specifications. Flash on! | ||
| + | Image:Day_5_Image_3.jpg|The computer and the PC to test the regs. | ||
| + | Image:Day_5_Image_4.jpg|The reg rails on top of the battery box and 4 regs installed. | ||
| + | </gallery> | ||
| + | |||
[[Category:PHEV]] | [[Category:PHEV]] | ||
Revision as of 04:20, 14 November 2006
"GrayPerl" is the name of the Todd Dore, of the Fox Valley EAA chapter, Prius was converted in mid Nov 2006 with the third PiPrius kit. Todd has a PV system and a new Sunny boy grid tie inverter which will now help provide some of his transportation fuel needs.
Photos
Day 1
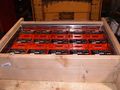
batteries arrive in box on the pallet, Notice the order of the batteries – they must be installed in the same pattern.
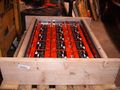
side view of battery box in pallet.
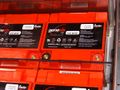
genesis XE30 sealed lead-acid batteries from Enersys. Provided by Dick Brown, who is a distributor. These are 12V batteries rated at 28 amp-hours at 10C.
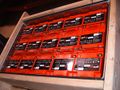
angle view of batteries in the box.
start to dis-assemble the false floor in the back of the Prius.
Rob Glowacki continuing the dis-assembly.
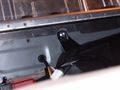
The Prius HV battery box. We must have turned off the flash on this one!
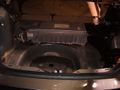
flash back on – lining up the battery box in the well at the back of the Prius. Rich Rudman engineered the box to fit snuggly in the factory-made well. The spare tire must be removed first.
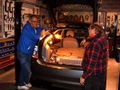
flash off again – Rob and John Emde discussing the weather.
the front left corner of the back of the Prius. The studs hold the keyless entry device, and must be sheared off to fit the battery box in.
John shearing the studs off. Watch those sparks!
John cutting away part of the battery box flange to fit around a bolt on the floor of the Prius.
Sizing up the battery box with the flange that John just cut.
The back right side of the battery box with the flange – that’s where a bolt hole will have to go. Note the black plastic box that we are looking down on – this is next to the 12V battery in the Prius and drives anti-lock brakes or the air bags (not sure which). Flash on with this photo!

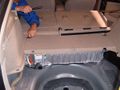
Filing away the sharp edges for the portions cut out of the flange for the battery box. Everything must be as flush as possible with the floor of the Prius. Note the box fits over the empty well for the spare tire. There is room for the spare tire, but you have to remove the battery box to get to it! (so take out the spare).
The left section of the cover for the Prius HV battery. Studs have been sheared off for the PHEV kit battery box.
The Prius is hoisted up and we’re looking at the area that we have to drill a bolt hole.
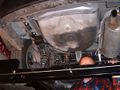
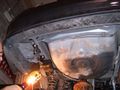
John smiling underneath the car. The muffler and the heat shield are visible. The muffler has to be pushed aside and the heat shield taken off to drill the bolt holes on the right side (everything is put back in place afterwards). Can’t see John’s entire face!
The center hole is where the bolt hole is drilled for the back left of the box (driver’s side).
Drilling the hole for the box.


Day 2
- Day 2 Image 1.jpg
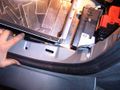
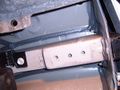
bolting the battery box by the muffler.
- Day 2 Image 2.jpg
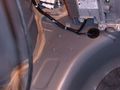
The heat shield removed and the battery bolt holes exposed.
- Day 2 Image 3.jpg
The heat shield installed. Notice the battery box bolt.
- Day 2 Image 4.jpg
The CAN-View installed. It is a very simple installation process (more images to follow). Main read out screen and change of PHEV controls are all done on the Prius display screen.
- Day 2 Image 5.jpg
Rich Rudman doesn’t want to be bothered! CAN-View installation.
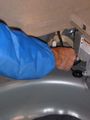
- Day 2 Image 6.jpg
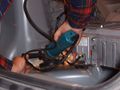
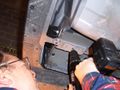
Removing the protective cover of the Prius HV battery box. Underneath are the main contactors.
- Day 2 Image 7.jpg
The orange cables are the most positive and most negative of the Prius HV system.
- Day 2 Image 8.jpg
The Rudman kit – cables come off of the HV battery. A couple of installation points inside.
- Day 2 Image 9.jpg
John working on the sharp edges of the HV cover.
- Day 2 Image 10.jpg
Inside the PHEV HV box where the main contactors are and cables. The black-coated cables represent our installation.
- Day 2 Image 11.jpg
tapping into the NAV system 12V wire to install the CAN-View.
Day 4
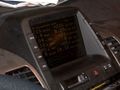
CAN-View.

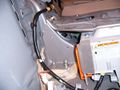
Rich standing by his charger. The charger is bolted into a cavity on the driver’s side. It also acts as a DC-DC converter for the PHEV system.
The CAN-View is on top of the NAV and underneath the driver’s seat.
- Day 4 Image 4.jpg
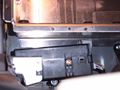
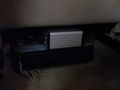
The battery box, charger, and relay box (with contactors) are shown here. All are part of the kit.
- Day 4 Image 5.jpg
The batteries have now been installed!
- Day 4 Image 6.jpg
The inside of the relay box. Notice the contactors. This controls the AC charging and the DC-DC function. It also has a safety so the DC-DC switches off when the car is charging or inactive completely.
- Day 4 Image 7.jpg
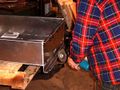
Another view of the charger when it’s on.
- Day 4 Image 8.jpg
Rich is testing the voltage of the batteries.
- Day 4 Image 9.jpg
The job is done! Everyone smiling in front of the completed car on Saturday. Everybody there helped out that day.


Day 5
- Day 5 Image 1.jpg
The kit installed with carpeting put back in. Lots of cables and wires to be hidden yet!
- Day 5 Image 2.jpg
testing some of the regs – the readout of the computer program. Only 6 are in the kit now and they all don’t quite work. Must make sure not to drain the batteries too much until all the regs arrive, are installed, and properly set. The computer program sets the reg specifications. Flash on!
- Day 5 Image 3.jpg
The computer and the PC to test the regs.
- Day 5 Image 4.jpg
The reg rails on top of the battery box and 4 regs installed.